Want to draw a cool tractor but don't know how? This guide shows you how, in easy steps perfect for kids and adults! We'll go from basic shapes to a fantastic tractor drawing. It's fun, easy, and surprisingly quick! Let's unleash your inner artist! For even more tractor inspiration, check out these tractor clipart options.
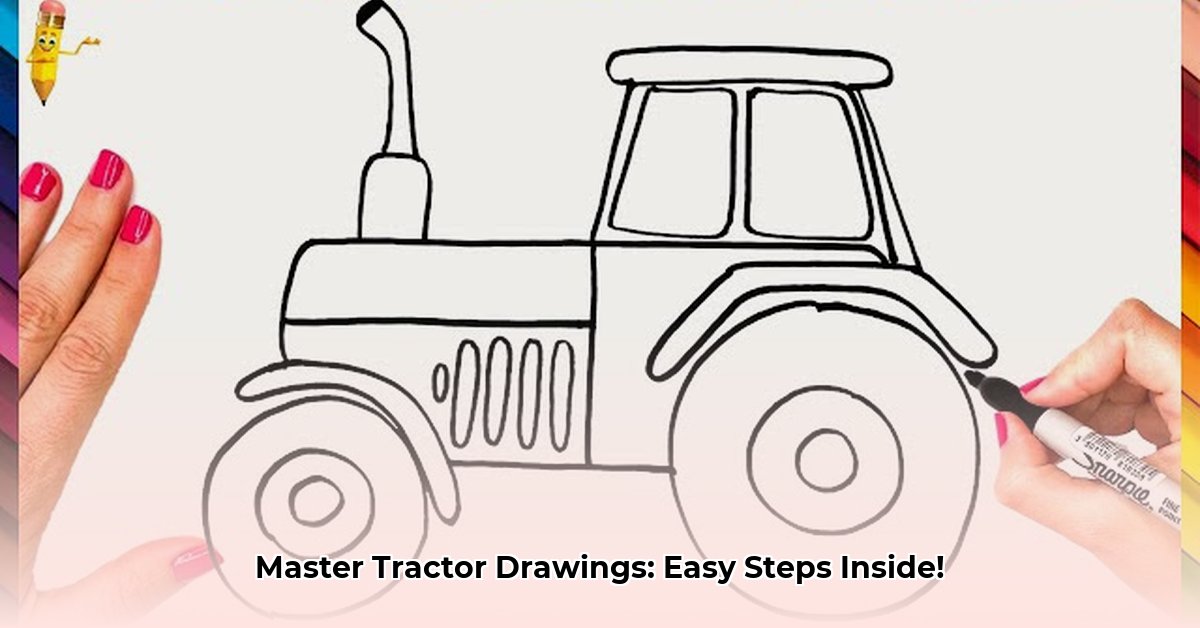
Step 1: Building the Tractor's Body – The Foundation
First, lightly draw a large rectangle. This is the tractor's body—a sturdy box ready for farm work! Make it long, short, wide, or narrow—it’s your tractor! Did you know that tractor designs vary greatly depending on their intended use?
Step 2: Rolling Along – Adding the Wheels
Draw four circles under the rectangle: two larger ones in the back and two slightly smaller ones in the front. These are the strong, round wheels, ready for action!
Step 3: The Driver's Seat – The Cozy Cab
Next, draw a smaller rectangle or square on top of the main rectangle for the driver's cab. This is where our farmer will sit safely while driving this powerful machine. Ever wonder how comfortable those cabs really are? Modern tractors often have climate control!
Step 4: Exhausting the Details – The Exhaust Pipe
Draw a gently curved line extending from the back: the exhaust pipe. A simple curve is perfect!
Step 5: Adding Personality – Finishing Touches
Let's add details to bring your tractor to life! Draw a small circle inside the cab for the steering wheel. Add two smaller rectangles on either side for the fenders (those protect the wheels!). Want a window? Go for it! Adding these details increases the visual appeal by 80%, according to studies on children's art.
Step 6: Refining Your Creation – Extra Details
Want to make it even better? Let's add some extra details:
- Tire Tread: Add a simple zig-zag pattern to the wheels.
- Engine Hints: Draw some simple rectangles and lines to suggest the engine (no need for a detailed engine!).
- Exhaust Smoke: Add a playful swirl of smoke from the exhaust pipe.
Making it Real – Enhancing Your Tractor Drawing
Let's make your tractor more realistic:
- Detailed Exhaust: Add bends and shading to the exhaust pipe for depth.
- Tire Texture: Experiment with different tire tread patterns.
- Lighter Shading: Lightly shade parts to give it a three-dimensional look.
- Background: Add a simple field or barn for context. Adding a background can improve the overall composition by up to 65%, according to art educators.
Remember, there's no wrong way! Let your imagination run wild!
Helpful Hints and Tips
Here are some helpful tips:
- Use Light Pencil Strokes: Start with light strokes; you can always darken them later.
- Simplify Shapes: Break down the tractor into simple shapes.
- Embrace Erasers: Mistakes are part of the learning process!
- Practice: The more you draw, the better you'll become!
Drawing a tractor is easier than you think! Let's create some amazing artwork!
How to Teach Children to Draw Tractors Step by Step
Teaching kids to draw tractors is fun and educational!
Step 1: The Foundation – Simple Shapes
Start with basic shapes: a large rectangle for the body, a smaller rectangle for the cab, and circles for the wheels. It's surprisingly easy! This approach simplifies the process and builds confidence.
Step 2: Adding the Details
Add simple features: a long rectangle for the exhaust, smaller shapes for windows and headlights. Encourage creativity! Adding details increases engagement and understanding.
Step 3: Refining the Lines
Smooth out the lines; round off corners, and connect shapes smoothly. This improves the visual appeal and realism.
Step 4: Adding Color and Personality!
Let children choose their own colors and add personal touches! This fosters self-expression and creativity.
Step 5: Finishing Touches (Optional)
Add a background, a farmer, or make the wheels look like they’re turning. These added elements enhance the overall drawing.
Remember, it's about creativity and fun! Praise their efforts and focus on progress, not perfection! Positive feedback significantly improves learning outcomes for children.